Heat management is essential to maintain your gaming PC. Playing video games can increase the performance of both your CPU and GPU, generating more heat than usual. Too much heat in your system can cause it to shut down or damage any sensitive components. Thus, it is crucial that each PC build has a proper cooling system and a thermal paste applied to the CPU.
The thermal paste is a cooling solution applied to the processor before installing the fan unit. It helps with the heat transfer from the integrated heat spreader (IHS) of the processor to the base plate or the water block of your cooling solution designed to dissipate the heat.
Applying the thermal paste to your IHS will help your CPU cool down. This will prevent any performance issues. If you have no idea how to use a new thermal paste to your CPU, below is a guide that can help you.
Follow the steps below to apply a new thermal paste to the CPU in your gaming PC:
Steps to Apply New Thermal Paste to CPU
- Step 1 – Make sure to choose a good thermal paste.
- Step 2 – Clean the CPU and the heat sink surfaces.
- Step 3 – Smoothen the heatsink and CPU surface with wet sand.
- Step 4 – Apply the right amount of thermal paste to the CPU’s cooler base.
- Step 5 – Install the heat sink to the processor.
- Step 6 – Don’t remove the heat sink after installing it.
- Step 7 – Reconnect your PC fan to the motherboard.
- Step 8 – Boot your gaming PC system.
Step 1 – Make sure to choose a good thermal paste.
The standard thermal greases you will find on the market are made from silicone and zinc oxide. But if you have a budget, it is definitely recommended to buy a thermal paste that contains silver or ceramic. This is because silver or ceramic thermal paste is more efficient in heat transmission. Thus, if you are running a high-end gaming PC, choose a thermal paste containing silver, copper, or gold.
Step 2 – Clean the CPU and the heat sink surfaces.
Before applying a new thermal paste, you need to clean the CPU and heat sink surfaces. Take a cotton ball with isopropyl alcohol. Use the cotton ball to wipe the surface clean.
Step 3 – Smoothen the heatsink and CPU surface with wet sand.
The heat sink and CPU surfaces should be perfectly flat before you apply the thermal paste. So if the heat sink base is rough, you can wet-sand it using fine-grit paper or emery cloth. While this step isn’t necessary, it is definitely recommended to reach the best cooling performance possible.
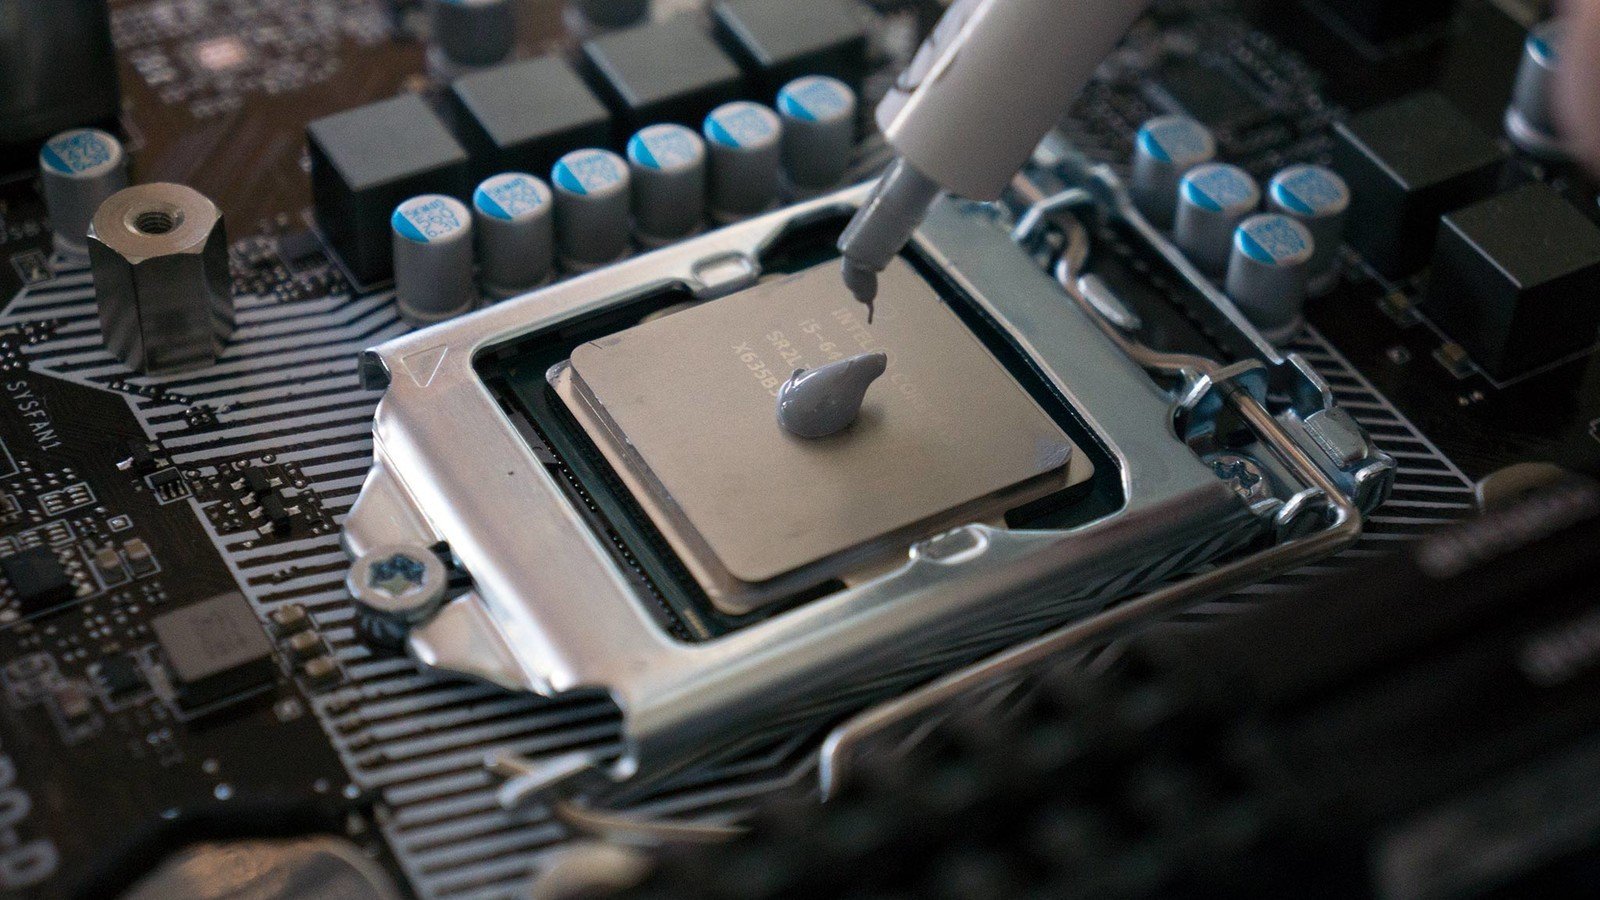
Step 4 – Apply the right amount of thermal paste to the CPU’s cooler base.
Drop a small portion of the thermal paste to the center of the CPU’s cooler base. You should only use the correct amount of thermal paste, which should be the size of a pea. An insufficient amount will not cover the surface area needed to be effective. While putting too much may reduce the efficacy of the thermal paste. And you may risk spilling out onto the motherboard during installation.
Remember that there is no need to spread the thermal paste for circular coolers because the applied pressure will spread it evenly across the heat sink surface.
Step 5 – Install the heat sink to the processor.
Make sure to attach the heat sink processor with even pressure from all sides. This way, the thermal paste will spread on the entire contact surface. It will create a thin, even layer that will fill any gaps. However, make sure that it will not have any excess build-up.
As the heat is applied, the thermal paste will become thinner and spread towards the edges. Use a small amount of paste.
Step 6 – Don’t remove the heat sink after installing it.
At all causes, avoid removing the heatsink just after you have installed it. Although it may be difficult to check if the paste has been applied correctly. Remember that if you break the seal created when you attach the heat sink, you will need to restart the whole process. That means you must clean the old paste again and reapply some thermal paste.
Step 7 – Reconnect your PC fan to the motherboard.
Once you have installed the heatsink, you need to reconnect the PC fan to the motherboard. The wire of your PC fan should be plugged into the CPU fan socket. This way, you will adjust the fan speed automatically without the need to change the voltage.
Step 8 – Boot your gaming PC system.
Turn on your computer and check if the fan is working. Press F1 to enter the BIOS. Check if the CPU and GPU temperature is normal. It should be below 104°F or 40°C when idle.
Source: