
A solid monitor is a great way to level up your gaming experience. A crisper resolution or higher frame rate makes all the difference. If you haven’t bought a new gaming monitor, then you might want to check this guide we made on “How to Choose a Gaming Monitor for Your PC“. When you do get your shiny new monitor, you will want to know how to set it up properly.
If reading is not your thing and you don’t have enough time to glance over our monitor buying guide, here are the important features to consider when purchasing a new gaming monitor.
- Screen size – 24 to 27 inches will get the job done. If you prefer something bigger consider 32” or other ultrawide options Also, if you are considering a larger monitor, remember that you should still be comfortable with its display despite its size.
- Resolution – The ideal resolution these days is WQHD or 2560 x 1440px. If you want a higher resolution, you can get a 4K gaming monitor, but those extra pixels are going to come at a performance cost so make sure you have a GPU that handle those extra pixels!
- Color Gamut – For the most vibrant image, look for monitors with a higher color gamut percentage. This ensure the display can create accurate colors to deliver the best image quality possible.
- Refresh Rate -The ideal refresh rate for a gaming monitor should be at least 60Hz. But for serious gaming, you can buy a model with a 144HZ display rate or higher. Most monitors labeled “gaming” these days will be 144hz.
- Response Time – You should look for a gaming monitor with 5ms down to 2ms or 1ms response time. A good response time ensures there is no delay between your mouse movements and what you see on screen.
- FreeSync & G-Sync – FreeSync is used by both AMD Radeon GPUs and NVIDIA GeForce GPUs, while G-Sync is compatible only with Nvidia GPUs and G-Sync compatible displays.
- Panel Type – There are three-panel technologies that gaming monitors use: TN/Twisted Nematic, IPS/In-Plane Switching, and VA/Vertical Alignment. In general IPS panels have the most vibrant colors but are more expensive. TNs will generally have the best budget options for high refresh rate monitors, while VA have excellent contrast and color ratings, though not quite as good as IPS displays.
With your new monitor in hand, here is a complete guide to installing it on your gaming PC:
Installing a New Monitor on Your Gaming PC
- Swap out the monitor
- Unbox your new gaming monitor.
- Connect the New Monitor to the PC
- Turn on the New Gaming Monitor
- Adjust Your Settings
1 – Swap Out The Monitor
The first step is to detach your old monitor from your PC. Shut down your computer and unplug all the cables. Clear off your desk and set your old monitor aside.
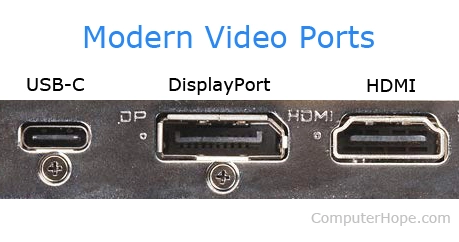
Before you get rid of your old cable, make sure that you don’t need it to install your new monitor. Modern video ports include USB-C, DisplayPort, and HDMI. While older video ports include DVI, S-Video, and VGA. The old cable should match up with your new monitor. If not, toss that aside.
Clear off your desktop so you have room to maneuver the new monitor.
2 – Unbox Your New Gaming Monitor
Once the area is clear, get that shiny new gaming monitor unboxed. Monitors can be pretty big and bulky, so be careful taking it out of the box. If you need someone’s help, always ask. Better safe than sorry. Install it on the desk. Don’t hurry to plug in the monitor and turn it on. Instead, turn to your monitor’s manual and follow the setup instructions.
3 – Connect the New Monitor to The PC
Use your HDMI or DisplayPort cable to connect the monitor to the PC.
Most monitors include two cables with your monitor. The first is a display cable to connect your monitor to your PC, while the second is the power cable that powers the monitor.
Follow these steps to connect your monitor to your gaming PC:
- Step 1 – Go find the monitor’s connector cable – either the one included with your monitor or the old one you had on hand.
- Step 2 – Match the cable with one of the video ports located on the back of your new monitor. Check the images of the ports below to have an idea:
- Step 3 – The next step is to plug the cable into their corresponding ports on both your new monitor and at the back of your gaming PC. If your gaming monitor does not have the same connector cable as your gaming PC, you can consider one of these options:
- Buy a different cable compatible with your gaming PC and monitor.
- You can also purchase a video converter that changes the connector type into another.
- Purchase the new video card with new connectors.
- Step 4 – Plug the power cord into the back of the monitor and the other end into your power outlet.
4 – Turn on Your New Gaming Monitor
The on the power socket for your gaming monitor. The monitor will start for some seconds and will then go on standby mode with the power indicator on. If ever you don’t see the light, you can check the power switches on the back of the gaming monitor. Once you confirm that the power is working, it’s time to turn on your PC and see that new monitor come to life.
It may take a few seconds, but you should be able to see the display on your new monitor after turning the PC on.
Step 5 – Adjust Your Settings
Once your monitor is on and working, fine tune your display settings in the Control panel. Go to the Control Panel, then click Appearance and Display. Adjust any settings until you are satisfied with your gaming monitor’s display.
Another way to adjust your monitor settings is with the buttons on the monitor (if it has them). Consult your monitors manual for how to navigate and adjust things with these buttons and menus.