Post written by Kevin “qxc” Riley of compLexity Gaming. Featured image sourced from Liquipedia.
On many of the older maps, the order of expansions was relatively easy/obvious. From the most recent and current ladder pool Daedalus Point, Alterzim Stronghold, Star Station stand out as some of the maps that it was most obvious in how you should be expanding at least up to 3 bases. This blog is all about taking a look at some of the current ladder maps and their expansions. I’m going to start by explaining the basics of expansions, where to place your units to defend expansions and why you’re taking said expansions. After that, I’ll do an in depth analysis of Frost with specific explanation and then do a much briefer explanation of the other maps.
Another note before we start, when I refer to the central position to defend x bases, this can also be turned around immediately if you’re the attacker and you’re trying to threaten x bases most effectively. Control that space and you should be able to outmaneuever your opponent’s army with effective control and scouting.

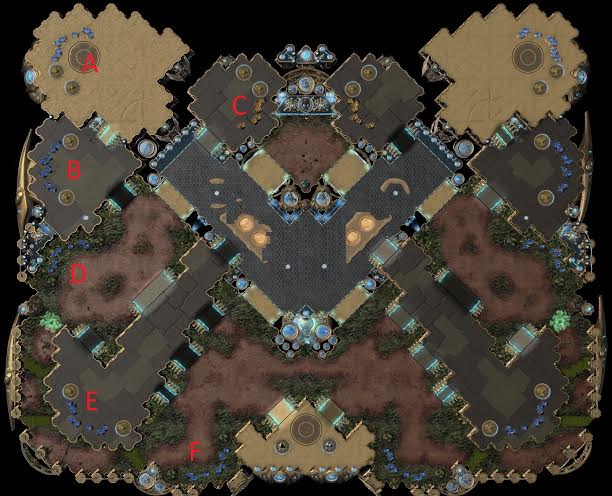
The main question comes in determing whether you should take C or D as your 3rd base as you’ll almost always want to take the other as your 4th base. In this case, it mostly comes down to spawn positions. If your opponent spawned in the top left, you will almost certainly want to take C as your 3rd, and maybe even F as your 4th.
The cliff above your 3rd creates a lot of vulnerabilities that are easier dealt with when you have the extra economy of your 4th. Also, if you take that base as your 3rd, your opponent can usually pin you to defense by staying just on the other side of the small choke point. It’s hard to force a good engagement there because of the small choke and you don’t really want to have to leave a significant amount of units on defense/build static D. The other issue is that if your opponent establishes control of the top of that cliff, you have to fight up a ramp/choke to get it back which is less than ideal.
If your opponent spawns in one of the bottom two positions you may want to take D as your 3rd to create that extra amount of rush distance, especially if it’s a fast 3rd. If you’re playing more aggressively then it will make more sense to expand to C since that gives you a more forward rally.
From there, you’re generally going to expand to E if your opponent is in the bottom right, F if they’re in the top left, and depending on the situation E or F if the position is cross. If you can control your opponent’s watch tower then F is the easier base to hold since you control the fastest way to get to it and can easily force your opponent to fight
There are a couple important parts of expansion control. First, you want to centralize your army in such a way that you can put it inbetween any large ground assault from your opponent before they get in range of the expansion. In order to do that effectively, you have to have lots of small units spread out to spot.
So back to the previous example. You spawned in A and your opponent was cross. You want to take a 5th base at F because you have control at his watch tower. In order to maintain this control, you have to be able to spot an army coming around the bottom with enough time to get in between it and F. Likewise, you need something to spot at the top watch tower and the far left passage so that you can move your army back and not get cut off from your main/backstabbed and also be able to cover the space above D if he’s moving a sizable force that way. Defending expansions is always done in these two parts: centralize to control the fastest route from your opponent’s central location to your expansions and have spotters to detect their presence with enough time to reposition before they are able to kill said base.
If, for example we were playing more defensive and expanded to E as our 5th we can defend this from his watch tower, but the spotter has to be much more advanced, almost to his base on that left side in order to see a big army movement and give us time to pull all the way back and set up at E. Taking E is almost committing yourself to the longer game because you’ll have much more trouble actually pushing without leaving that base exposed.
Now for some briefer explanations with the other maps.
Next up is Habitation Station:
The big question is, do you take the gold as your 3rd, and if you don’t, do you take it as your 4th? This all comes down to how aggressive your strategy is because in order to hold the gold you effectively have to be able to control both the watch tower and be able to defend an attack swinging around back through D and threatening your main, but if your strategy puts your opponent in a contain or pins their units at home then this is more reasonable. You defend both with aggression. Besides that, you’re looking at D,E,F in order where you only try for C if you get a particular positional advantage/control of the watch tower.
Another new map. Heavy Rain.
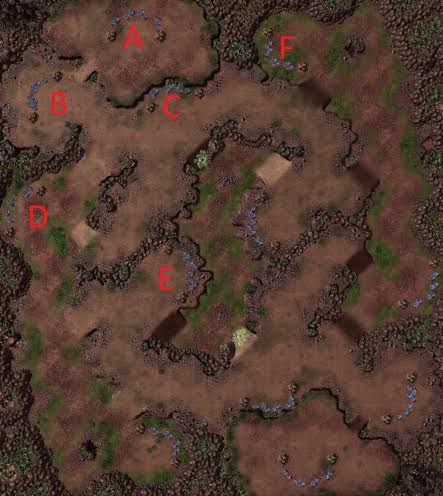
The biggest question is C or D for your 3rd. If you take D, then the next closest expansion is E, but this suffers from the issue of exposed mineral line from the center. In order to defend E you need to move your army below the ramp to your opponent’s 3rd which gives you a decent forward position but can be problematic if your opponent takes the high ground and swings around.
Going to C and then F means that your army needs to sit on the right side of the map to defend your 3rd/4th while leaving the entire left side open to main/natural runbys and backstabs.
This may be one of the strangest maps for expansions. It’s very unclear exactly how you want to proceed, but at least both players have a similar issue. This map may favor aggression much more than passive play in the 4+ base mark because of the strange layout. It is very hard to find a central location that still gives you the flexibility you need since the very center of the map is low ground and thus vulnerable in a variety of ways – vision & having to go up a ramp at some point being the biggest. My advice, attack, spread out and abuse the fact that the 5th base is a tough hold.
Now for Yeonsu which is a map where the 3rd bases are seen interchanged much more than most.
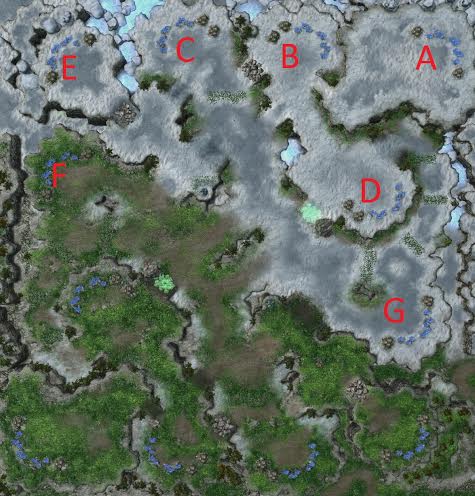
Usually about 60/40 or 70/30 I see D taken as a 3rd instead of D while I personally much prefer C. While taking D as your 3rd gives you an incredibly strong defensive position by putting your army inbetween B and D, it leaves you exposed to the slightly more tactical manuever of attacking D from the low ground with a small group of units and then forcing an engagement down the ramp through a choke into your army for defense. That can be a bit tough if you don’t scout your opponent in time since they get a nice flank and there’s no escape route if you’re stuck around G.
Besides that, D puts you in the awkward position of having to fight down a ramp to get to the center of the map unless you go out at your natural. An army positioned in the low ground between the watch tower and D gives a lot of control vs the defending player as they can force any movement onto the map to either be far back @ B (thus opening up aggression toward D) or down a ramp into their army.
The simplest configuration of 4 bases is ABCE because you can centralize your army at your watch tower with spotters below the ramp between D and G, to the right of D and to the left of F. For whatever reason this map tends to go from 3 bases to 5 as people often double expand from ABC to ABCDE. Going onto five bases here forces your army to want to be in the exact center of the map with spotters on the left below F and near G. That allows you to control your side of the map without much trouble, except that any battle you have against an opponent controlling the watch tower will be up hill and into the watch tower’s vision which is poor. Generally, the best way to go onto 5 bases on this map is also to get onto the aggressive end of things and take their watch towers. If you can control the opponent’s watch tower it becomes extremely difficult to defend the equivalent ABCD, and E becomes almost instantly forfeit.
And the final map is Polar Night
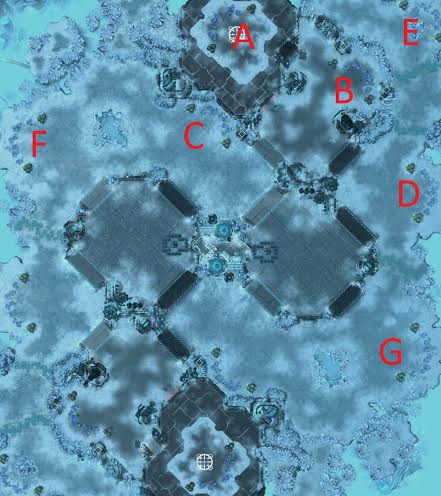
Almost every z/p takes D as their 3rd. It’s easier to defend because you can put your army between B and D and and also take E as a ‘free’ 4th relatively easily. Due to lift off and being reckless, terran players tend to take C as their 3rd which creates the weird situation of where to go next. If you go to F, your army effectively has to sit on the left watch tower to control those bases with a spotter for the left low ground and the right watch tower. This gives you enough time to get back to defend your main as needed, but makes it hard to defend runbys. The real issue though is that you have no way to take a 5th safely. If you try to hold ABCFD then if you control the left tower, your opponent can run up the right freely and vice versa.
As a terran I prefer to take C and then E as my 4th. E is extremely defensible and hard to get to. By the time I’m taking D, I try to have C mined out, or at least I’m ready to abandon it. C is an expansion of convenience because of the short float distance, but 4 and 5 bases on I want it to be almost totally dry because it is a huge strategic liability. I need to hold the right watch tower for E & D, but cannot also defend C if I do that. The next logical base is G which you can defend if you move your position a bit farther toward your opponent on the right side. This puts extra strain on your scouting though as a runby back to your main becomes a potential problem.
Each map presents its own set of challenges to overcome in regards to expanding. Just remember a couple key points.
-Centralize your army so that you control the fastest/shortest route from your opponent’s side of the map to your bases.
-Have spotters on the fringes so that you can move and react before their army gets too advanced that you’re either attacking into them or are taking infrastructure damage.
-Mined out bases carry little value, don’t be afraid to abandon bases later in the game to consolidate into a more stable position.